| | | |
| | | ; |
| | | ; |
| | | ; |
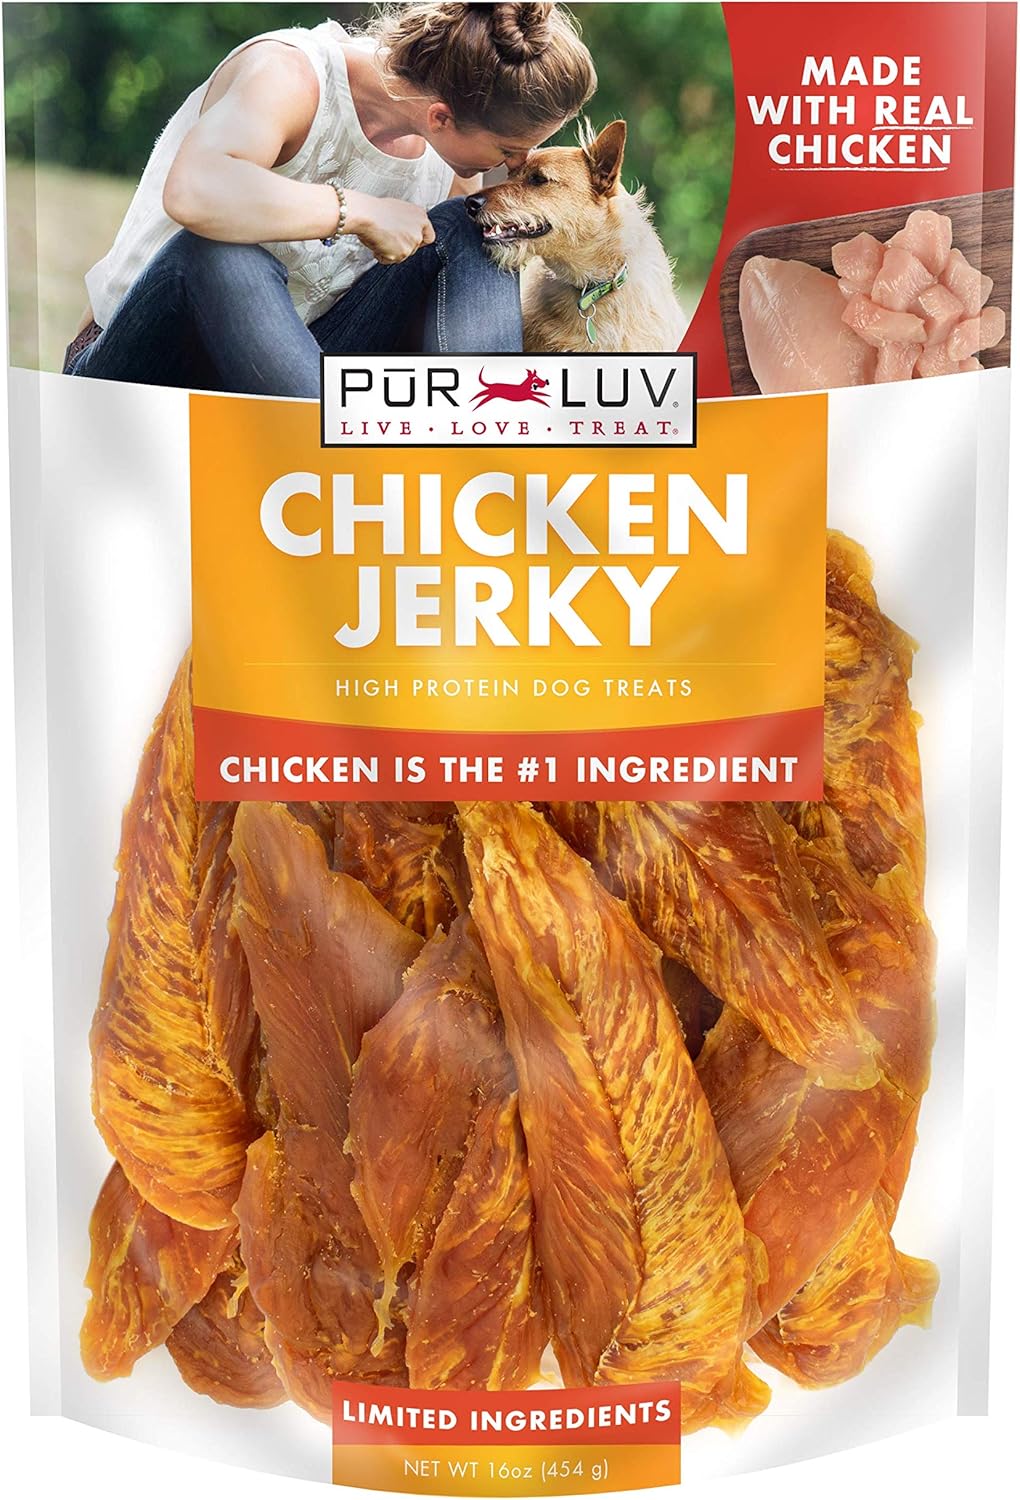
| Pur Luv Chicken Jerky Dog Treats, Made with 100% Real Chicken Breast, 16 Ounces, Healthy, Easily Digestible, Long-Lasting, High Protein, Satisfies Dog's Urge to Chew | | ; |
Pumpkin and applesauce are two of the most beloved ingredients in homemade dog treats, and for good reason. This dynamic duo combines natural sweetness, digestive support, and seasonal appeal into treats that dogs absolutely crave. Homemade Pumpkin Applesauce Dog Treats represent the perfect balance of nutrition and indulgence—wholesome enough for regular treats, yet special enough for seasonal celebrations or training rewards.
Unlike commercial treats that often contain artificial flavors and preservatives, these homemade treats let you control every ingredient that goes into your dog’s mouth. The combination of pumpkin’s fiber and nutrients with applesauce’s natural sweetness and vitamins creates a treat that’s as good for your dog’s health as it is delicious on their palate.
Why Pumpkin and Applesauce Are Excellent for Dogs
Pumpkin is a nutritional powerhouse for canines. Rich in fiber, pumpkin supports healthy digestion and can help regulate bowel movements in dogs experiencing either constipation or diarrhea. It’s low in calories yet nutrient-dense, providing beta-carotene (which converts to vitamin A), potassium, and manganese. Pumpkin’s soluble fiber content promotes beneficial gut bacteria growth, supporting overall digestive health and immune function.
Applesauce complements pumpkin beautifully by adding natural sweetness without refined sugar. Apples contain pectin, a type of soluble fiber that works synergistically with pumpkin’s fiber to support digestive health. Applesauce provides vitamin C, which supports immune function and acts as an antioxidant. The natural sugars in applesauce provide quick energy, making these treats perfect for active dogs or training sessions.
Together, pumpkin and applesauce create treats that support digestive health, provide sustained energy, and deliver concentrated nutrition in a form dogs find irresistible. These ingredients are particularly beneficial for senior dogs, dogs with sensitive stomachs, or those recovering from digestive upset.
About This Recipe
The Homemade Pumpkin Applesauce Dog Treats recipe is designed for simplicity and nutrition. Using pure pumpkin puree and unsweetened applesauce ensures authentic flavor without added sugars or preservatives. The recipe yields approximately 24-30 treats, depending on your cookie cutter size, and bakes in just 18-22 minutes.
These treats store exceptionally well—up to two weeks in the refrigerator or three months in the freezer. This makes them ideal for batch preparation, allowing you to maintain a supply of healthy treats year-round. The recipe is also easily customizable with complementary ingredients like cinnamon, ginger, or additional vegetables.
Ingredients
To create these delightful seasonal treats, you’ll need the following simple, dog-safe ingredients:
|
Ingredient
|
Amount
|
Notes
|
|
Pure pumpkin puree
|
1 cup
|
Use 100% pure pumpkin, not pumpkin pie filling
|
|
Unsweetened applesauce
|
1/2 cup
|
Choose unsweetened varieties without added sugars
|
|
Whole wheat flour
|
1 1/2 cups
|
Provides structure and fiber
|
|
Rolled oats
|
1/2 cup
|
Adds texture and nutrition
|
|
Egg
|
1 large
|
Binds ingredients together
|
|
Cinnamon (optional)
|
1/2 teaspoon
|
Dog-safe warming spice, adds flavor depth
|
|
Ginger (optional)
|
1/4 teaspoon
|
Dog-safe, supports digestion
|
|
Water
|
2-3 tablespoons
|
Adjust as needed for consistency
|
Important Quality Notes: Always use pure pumpkin puree, not pumpkin pie filling, which contains added sugars and spices not suitable for dogs. Select unsweetened applesauce to avoid unnecessary sugar. These quality choices ensure your treats provide maximum nutrition without hidden additives.
Step-by-Step Instructions
Preparation Phase
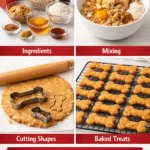
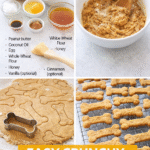
Begin by preheating your oven to 350°F (175°C). Line a baking sheet with parchment paper to prevent sticking and simplify cleanup. Have all ingredients measured and ready before you start—this ensures a smooth preparation process and prevents ingredient substitutions mid-recipe.
Mixing the Base Ingredients
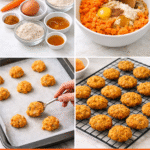
In a large mixing bowl, combine the pure pumpkin puree with the unsweetened applesauce. Stir these together thoroughly until well blended. The mixture should have a smooth, uniform consistency. Next, add the whole wheat flour and rolled oats to the pumpkin-applesauce mixture. Stir to combine all dry ingredients with the wet mixture.
If you’re using the optional cinnamon and ginger, add them now. These warming spices complement the pumpkin and applesauce beautifully, adding depth to the flavor profile while providing additional digestive support. Stir until evenly distributed.
Binding the Dough
Crack the egg into the mixture and stir thoroughly. The egg acts as a binder, helping all the ingredients hold together into a cohesive dough. Mix until you achieve a dough consistency that holds together when squeezed but isn’t overly sticky. If the mixture seems too dry and crumbly, add water one tablespoon at a time until you reach the right consistency. The dough should be similar in texture to sugar cookie dough.
Shaping the Treats
On a lightly floured surface, roll out the dough to approximately 1/4 inch thickness. This thickness ensures even baking and creates treats that are easy for your dog to chew. Using cookie cutters, cut out your desired shapes. Pumpkin-themed cutters like leaves or pumpkins work beautifully for seasonal appeal, though bone-shaped or simple round cutters work equally well.
Place the shaped treats on the prepared baking sheet, leaving about an inch of space between each treat to allow for even baking and air circulation.
Baking
Place the baking sheet in the preheated 350°F oven and bake for 18-22 minutes, or until the treats are golden brown and firm to the touch. The exact baking time may vary depending on your oven and the size of your treats. Check them during the final minutes of baking to ensure they don’t overbake.
The treats should be golden brown on the outside and firm throughout. If they’re still soft in the center after 22 minutes, bake for an additional 2-3 minutes.
Cooling
Remove the baking sheet from the oven and allow the treats to cool completely on a wire rack before serving them to your dog. This cooling period is crucial because it allows the treats to firm up and become easier to handle. Serving treats while they’re still warm can cause them to crumble, and warm treats may be too soft for your dog to enjoy properly.
Storage and Shelf Life
Proper storage ensures your homemade treats remain fresh and safe for your dog to enjoy.
Room Temperature Storage: Place cooled treats in an airtight container and store at room temperature for up to 3-5 days. This is ideal if you plan to use the treats quickly and your home remains at a comfortable temperature.
Refrigerator Storage: For extended freshness, store treats in an airtight container in the refrigerator for up to two weeks.
This method is particularly useful during warmer months or if you want to preserve treats longer than a few days.
Freezer Storage: To maintain a supply of treats over several months, freeze them in an airtight container or freezer bag for up to three months. Simply thaw treats at room temperature for 30 minutes before serving, or serve them directly from the freezer as a refreshing, cool treat on warm days.
Nutritional Benefits
Each ingredient in this recipe contributes specific nutritional value to support your dog’s health and wellbeing.
Pumpkin Puree provides soluble fiber that supports digestive health and regularity. It’s rich in beta-carotene, which converts to vitamin A for eye health and immune function. Pumpkin contains potassium for heart health and manganese for bone development. Its low calorie content makes it ideal for weight management while providing concentrated nutrition.
Applesauce delivers natural sweetness without refined sugar. It provides pectin, a soluble fiber that works synergistically with pumpkin to support digestion. Applesauce contains vitamin C for immune support and antioxidant protection. The natural sugars provide quick energy for active dogs.
Whole Wheat Flour provides complex carbohydrates and fiber, promoting sustained energy and digestive health. It contains B vitamins and minerals like iron and magnesium. The fiber content supports healthy digestion and promotes satiety.
Rolled Oats are an excellent source of soluble fiber, which supports digestive health. Oats contain beta-glucans, compounds with potential immune-supporting properties. They provide a satisfying texture that dogs enjoy and contribute to sustained energy.
Eggs provide complete protein with all essential amino acids. They contain choline, which supports brain health and cognitive function. Eggs also provide lutein and zeaxanthin, antioxidants that support eye health.
Cinnamon (optional) contains antioxidants and may support blood sugar regulation. It has warming properties that complement the pumpkin flavor and may support digestive comfort.
Ginger (optional) is traditionally used to support digestive health and may help with mild nausea or digestive discomfort. It provides warming properties and adds subtle spice to the treat flavor.
Serving Suggestions and Portion Guidelines
While these treats are made with wholesome ingredients, they should still be given in moderation as part of a balanced diet. Treats should comprise no more than 10% of your dog’s daily caloric intake, with the remaining 90% coming from their regular dog food.
For small dogs (under 20 pounds), offer one to two treats per day. Medium dogs (20-50 pounds) can enjoy two to three treats daily, while large dogs (over 50 pounds) can have three to four treats per day. Adjust portions based on your individual dog’s size, activity level, and overall diet.
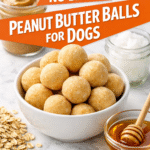
These treats work wonderfully as training rewards, post-exercise snacks, or simple expressions of affection. Some pet parents enjoy using them as puzzle toy fillers or breaking them into smaller pieces for training sessions. During fall and winter months, these seasonal treats make perfect holiday gifts for dog-loving friends and family members.