Classic Grain-Free Banana Bread for Dogs

Grain-Free Banana Bread for Dogs (3 Easy Recipes Your Pup Will Love)

These 3 grain-free banana bread recipes for dogs are soft, moist, and completely safe for your pup — made without wheat, gluten, or any artificial ingredients. Whether your dog has a grain sensitivity, a food allergy, or you just want to give them something wholesome and homemade, these recipes are simple enough for any kitchen and irresistible enough for any dog.

Before you bake: Always use xylitol-free peanut butter where called for. Never add sugar, salt, nutmeg, or raisins — all are harmful or toxic to dogs. Use ripe, spotty bananas for the best flavour and natural sweetness.


Recipe 1: Classic Grain-Free Banana Bread for Dogs

Classic Grain-Free Banana Bread for Dogs

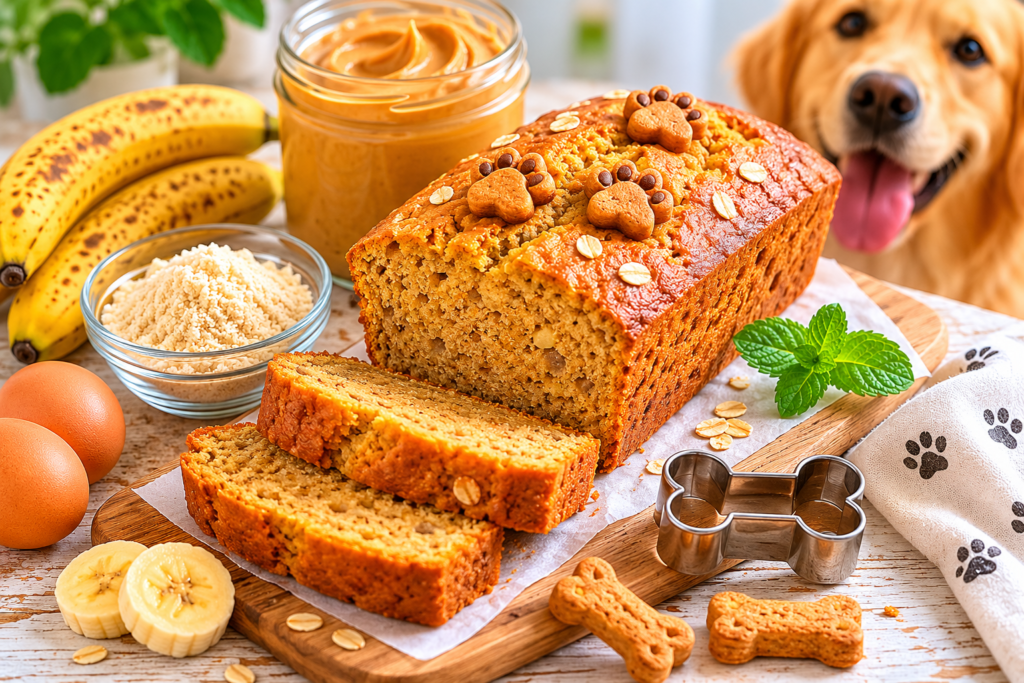
This is the foundational recipe — simple, soft, and endlessly reliable. Made with almond flour instead of wheat flour, it is naturally gluten-free and packed with protein and healthy fats. Dogs love the banana flavour and the tender crumb. Great for everyday training treats or a special snack.

Ingredients

  • 2 ripe bananas, mashed
  • 2 eggs
  • 1½ cups almond flour
  • 2 tablespoons coconut oil, melted
  • 1 teaspoon baking powder (aluminium-free)
  • ¼ teaspoon cinnamon (optional — safe for dogs in small amounts)

Instructions

  1. Preheat oven to 350°F (175°C). Line a small loaf tin (8×4 inch) with baking paper and lightly grease with coconut oil.
  2. In a large bowl, mash the bananas thoroughly with a fork until completely smooth with no large lumps.
  3. Add eggs and melted coconut oil to the mashed banana. Whisk together until well combined.
  4. Add almond flour, baking powder, and cinnamon (if using). Stir until a smooth, thick batter forms. Do not overmix.
  5. Pour batter into the prepared loaf tin and smooth the surface with the back of a spoon.
  6. Bake for 28–32 minutes until a toothpick inserted in the centre comes out clean and the top is lightly golden.
  7. Allow to cool completely in the tin for at least 20 minutes before removing. Do not serve warm — the bread must be fully cool to set properly.
  8. Slice into portions appropriate for your dog’s size (see serving guide below).
  9. Store in an airtight container in the refrigerator for up to 5 days, or freeze individual slices for up to 8 weeks.

Why Almond Flour is Great for Dogs

  • Grain-free and gluten-free: Ideal for dogs with wheat or grain sensitivities
  • High in protein: Approximately 6g protein per 100g — supports muscle maintenance
  • Healthy fats: Monounsaturated fats support skin and coat health
  • Low glycaemic index: Does not cause blood sugar spikes like wheat flour
  • Note: Almond flour is safe for dogs in baked goods but whole almonds are not recommended — always use the flour form only

Serving Guide

Dog Size Slice Thickness How Often Approx. Calories
Small (under 20 lb) ¼ inch slice 2–3 times per week ~40 kcal
Medium (20–50 lb) ½ inch slice 2–3 times per week ~80 kcal
Large (50 lb+) 1 inch slice 2–3 times per week ~160 kcal

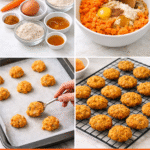
Recipe 2: Grain-Free Banana & Pumpkin Dog Bread

Grain-Free Banana & Pumpkin Dog Bread

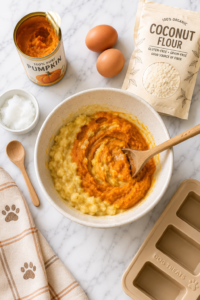
This recipe swaps almond flour for coconut flour and adds pumpkin puree for a supremely moist, digestive-friendly loaf. Coconut flour absorbs a lot of liquid, making it perfect for a dense, satisfying bread. The pumpkin adds fibre for gut health and a naturally mild sweetness dogs adore. This is the recipe to reach for when your dog has a sensitive stomach.

Ingredients

  • 2 ripe bananas, mashed
  • ½ cup pure canned pumpkin (100% pumpkin — not pumpkin pie filling)
  • 3 eggs
  • ½ cup coconut flour
  • 2 tablespoons coconut oil, melted
  • 1 teaspoon baking powder (aluminium-free)
  • 2 tablespoons plain unsweetened applesauce (optional — adds moisture)

Instructions

  1. Preheat oven to 350°F (175°C). Grease a small loaf tin generously with coconut oil — coconut flour bakes tend to stick more than almond flour.
  2. Mash bananas thoroughly in a large bowl. Add pumpkin puree, eggs, melted coconut oil, and applesauce (if using). Mix until completely smooth.
  3. Sift in coconut flour and baking powder. Stir well — coconut flour will absorb the liquid quickly and the batter will thicken noticeably. This is normal.
  4. Let the batter rest for 3–4 minutes to allow the coconut flour to fully hydrate. The batter should be thick but still pourable. If it seems too stiff, add 1–2 tablespoons of water.
  5. Spoon batter into the prepared loaf tin. Smooth the top firmly with a wet spoon.
  6. Bake for 35–40 minutes until a skewer inserted in the centre comes out clean. The top should be a deep golden brown and the sides slightly pulled away from the tin.
  7. Cool completely on a wire rack before slicing — at least 30 minutes. Coconut flour bread crumbles if cut warm.
  8. Slice and store in the refrigerator for up to 5 days or freeze for up to 8 weeks.

Why Pumpkin is a Superfood for Dogs

  • Digestive support: Soluble fibre in pumpkin regulates digestion — helps with both diarrhoea and constipation
  • Extremely low calorie: Only 26 kcal per 100g — adds bulk and moisture without adding calories
  • Vitamins A, C and E: Support immune health, vision, and a shiny coat
  • 92% water content: Excellent for keeping dogs hydrated, especially in summer
  • Beta-carotene: A powerful antioxidant that reduces inflammation and supports eye health

Serving Guide

Dog Size Slice Thickness How Often Approx. Calories
Small (under 20 lb) ¼ inch slice Daily (low calorie) ~30 kcal
Medium (20–50 lb) ½ inch slice Daily (low calorie) ~60 kcal
Large (50 lb+) 1 inch slice Daily (low calorie) ~120 kcal

Tip: This is the lowest-calorie of the three recipes, making it ideal for dogs on a weight management plan or those needing daily digestive support.


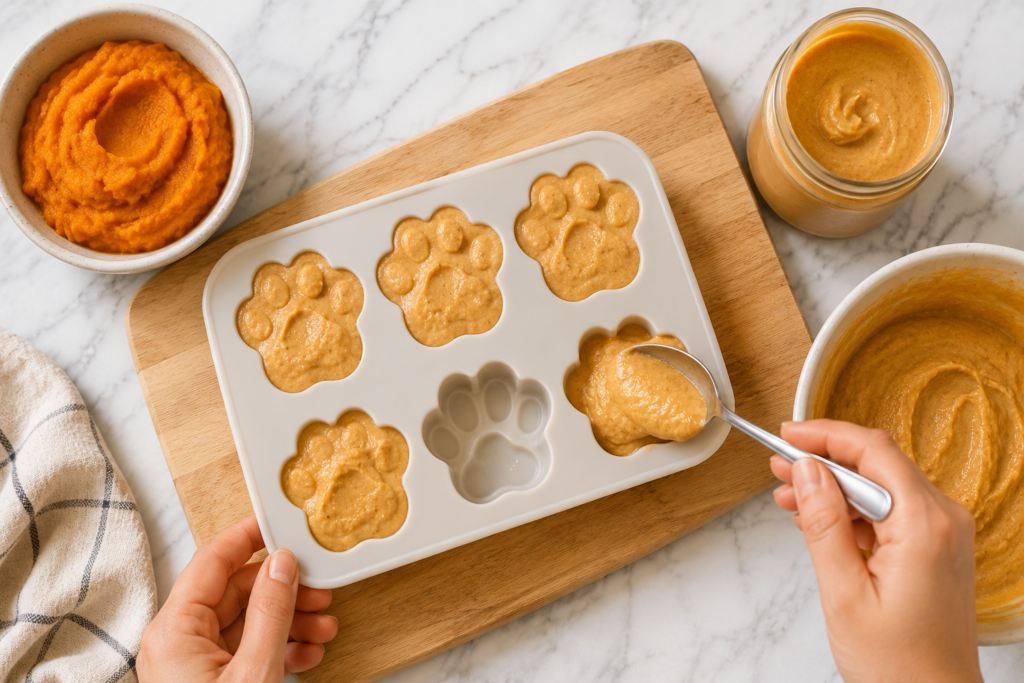
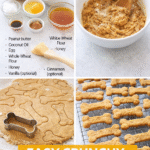
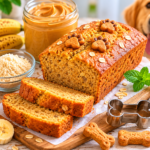
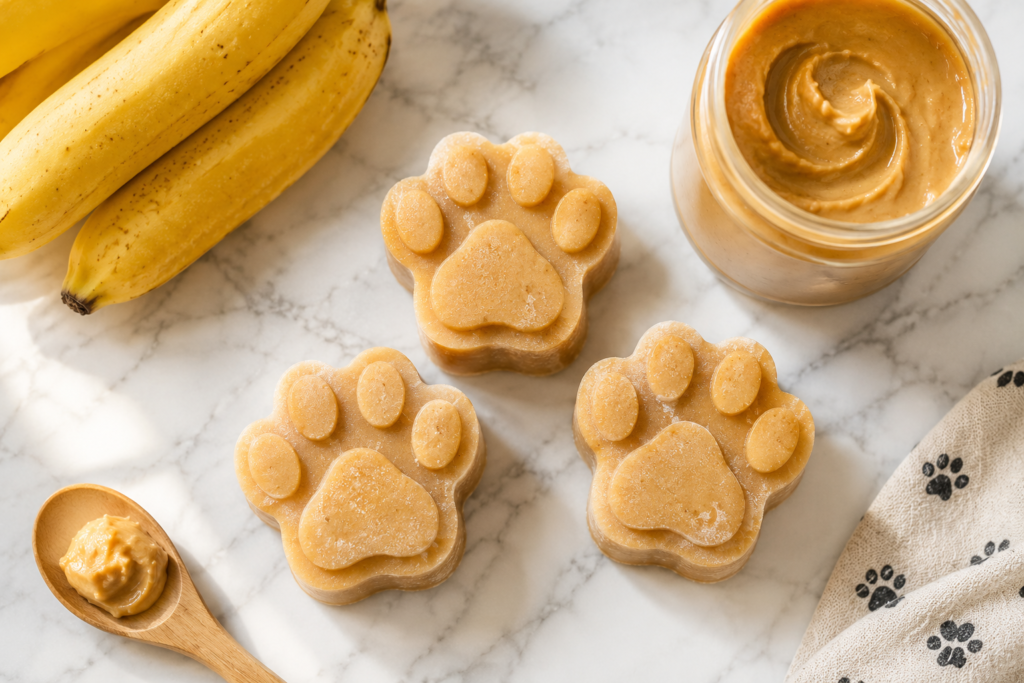
Recipe 3: Grain-Free Banana Peanut Butter & Blueberry Dog Bread

Grain-Free Banana Peanut Butter & Blueberry Dog Bread

This is the showstopper recipe — rich, moist, and visually beautiful with purple blueberry pockets running through every slice. Peanut butter adds creaminess and protein; blueberries provide a burst of antioxidants. This is the recipe dog owners share on Instagram and Pinterest, and the one dogs refuse to stop begging for. Perfect for special occasions, birthdays, or just because your dog deserves something extraordinary.

Ingredients

  • 2 ripe bananas, mashed
  • 3 tablespoons xylitol-free peanut butter
  • ½ cup fresh or frozen blueberries
  • 2 eggs
  • 1½ cups almond flour
  • 2 tablespoons coconut oil, melted
  • 1 teaspoon baking powder (aluminium-free)
  • 1 tablespoon honey (optional — skip for diabetic or overweight dogs)

Instructions

  1. Preheat oven to 350°F (175°C). Line a loaf tin with baking paper and grease well.
  2. In a large bowl, mash bananas. Add eggs, peanut butter, melted coconut oil, and honey (if using). Mix until smooth and well combined.
  3. Add almond flour and baking powder. Fold in gently until just combined — a few lumps are fine. Do not overmix or the bread becomes dense.
  4. Gently fold in the blueberries using a spatula. If using frozen blueberries, do not thaw first — they hold their shape better when folded in frozen and prevent the batter turning purple.
  5. Pour batter into the prepared tin. For an extra-beautiful finish, press a few blueberries onto the surface before baking.
  6. Bake for 30–35 minutes until golden on top and a skewer comes out clean from the centre.
  7. Cool completely — at least 25 minutes — before slicing. Blueberries stay very hot inside the bread.
  8. Slice and store in the refrigerator for up to 5 days. Freeze individual slices on a baking sheet first, then transfer to a zip-lock bag for up to 8 weeks.

Why Blueberries Are a Superfood for Dogs

  • Highest antioxidant fruit for dogs: Protects cells from oxidative stress — particularly beneficial for senior dogs
  • Supports brain health: Studies show blueberries improve cognitive function in ageing dogs
  • Anti-inflammatory: Helps dogs with arthritis and chronic inflammation
  • Low sugar, low calorie: Only 57 kcal per 100g — safe for most dogs
  • Vitamins C and K: Boost immune response and support bone health

Serving Guide

Dog Size Slice Thickness How Often Approx. Calories
Small (under 20 lb) ¼ inch slice 2–3 times per week ~50 kcal
Medium (20–50 lb) ½ inch slice 2–3 times per week ~100 kcal
Large (50 lb+) 1 inch slice 2–3 times per week ~200 kcal

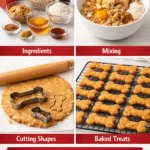
Baking Tips for Perfect Dog Bread Every Time

  • Use overripe bananas: The spottier and darker the banana, the sweeter and more flavourful the bread. Under-ripe bananas make a bland, starchy result.
  • Always cool completely: All three recipes are too delicate to slice warm. The starches need to set fully or the bread crumbles. A 20–30 minute cool is the minimum.
  • Coconut flour absorbs more liquid: If your Recipe 2 batter looks very thick, add water one tablespoon at a time. If it looks too loose, let it rest 5 minutes before adding more flour.
  • Freeze in single servings: Slice the entire loaf before freezing. Lay slices flat on a baking sheet, freeze for 1 hour, then stack in a zip-lock bag. Pull out individual portions as needed.
  • Make mini loaves for gifting: Divide any batter among a silicone muffin tin for individual-portion dog bread muffins. Bake time reduces to 15–18 minutes. Great for gifting to dog-owning friends.
  • Test with a skewer, not just time: All ovens vary. Always test doneness with a wooden skewer or toothpick — it should come out completely clean with no wet batter attached.

Ingredients to Never Add to Dog Bread

Ingredient Why It’s Dangerous Severity
Xylitol (in peanut butter) Causes insulin spike; liver failure; fatal in small doses 🛑 Emergency vet
Raisins or sultanas Cause acute kidney failure even in tiny amounts 🛑 Emergency vet
Nutmeg Causes seizures, tremors and hallucinations in dogs 🛑 Toxic — call vet
Chocolate chips Theobromine toxicity — affects heart and nervous system 🛑 Toxic — call vet
Salt Causes sodium ion poisoning in excess; dangerous for heart conditions ⚠️ Avoid entirely
Sugar or sweeteners Leads to obesity, dental disease, and blood sugar issues ⚠️ Avoid entirely
Macadamia nuts Cause weakness, vomiting, hyperthermia ⚠️ Toxic — call vet

Frequently Asked Questions

Can dogs eat banana bread?

Dogs can eat banana bread made specifically for them using dog-safe ingredients. Regular human banana bread is not safe for dogs as it contains sugar, salt, and often vanilla extract, nutmeg, or raisins — all of which are harmful. The three recipes on this page are specifically formulated to be safe, nutritious, and delicious for dogs.

Is almond flour safe for dogs?

Yes — almond flour is safe for dogs in baked goods. It is grain-free, gluten-free, and high in protein. Note that whole almonds are not recommended for dogs as they can cause digestive upset and are a choking hazard, but almond flour in baked treats is perfectly safe in moderate amounts.

Is coconut flour safe for dogs?

Yes — coconut flour is one of the best grain-free flours for dog treats. It is high in fibre, low in carbohydrates, and completely safe for dogs. It absorbs significantly more liquid than other flours, so recipes using coconut flour require more eggs and wet ingredients to maintain a moist, sliceable result.

Can I substitute oat flour in these recipes?

Oat flour is safe for dogs and can replace almond flour in Recipes 1 and 3, though the result will not be grain-free. Use a 1:1 substitution by weight rather than by volume, as oat flour is lighter than almond flour. The texture will be slightly denser and less rich.

How long does homemade dog bread last?

Stored in an airtight container in the refrigerator, all three recipes keep for 4–5 days. For longer storage, slice the loaf completely, freeze individual slices on a flat tray for 1 hour, then transfer to a zip-lock bag. Frozen slices keep for up to 8 weeks and thaw at room temperature in 15–20 minutes.

Can I make these recipes into dog biscuits instead of a loaf?

Yes — for all three recipes, reduce liquid slightly (omit one egg or reduce banana by half) to create a stiffer dough. Roll out to 1/4 inch thickness, cut with dog bone cutters, and bake at 325°F (165°C) for 18–22 minutes until firm and dry. Biscuits keep longer than bread — up to 2 weeks at room temperature in an airtight container.

Easy Peanut Butter Dog Ice Cream Recipe (3 Simple Recipes)

Looking for a way to treat your dog on a hot day? These 3 easy peanut butter dog ice cream recipes use simple ingredients you already have at home — no cooking required, no nasty additives, and totally safe for dogs. Your pup will go absolutely crazy for all three.

Important: Always use xylitol-free peanut butter. Xylitol is highly toxic to dogs and is found in many sugar-free and natural peanut butter brands. Check the label every time — safe brands include Jif, Skippy, and most standard supermarket peanut butters.


Recipe 1: 2-Ingredient Peanut Butter Banana Dog Ice Cream

peanut butter and bananaThe simplest dog ice cream you will ever make. Two ingredients, five minutes of prep, and your dog will think you are the best human alive. Bananas add natural sweetness and potassium while keeping the recipe completely treat-safe.

Ingredients

  • 2 ripe bananas, peeled and sliced
  • 3 tablespoons xylitol-free peanut butter

Instructions

  1. Peel and slice bananas into chunks. The riper the banana, the sweeter and creamier the result.
  2. Freeze the banana slices on a tray for at least 2 hours until completely solid.
  3. Place frozen banana slices and peanut butter into a blender or food processor.
  4. Blend on high until completely smooth and creamy — about 60 seconds. Scrape down the sides halfway through.
  5. Serve immediately as a soft-serve style treat, or spoon into silicone moulds or a muffin tin lined with cupcake cases.
  6. Freeze for a further 2–3 hours if you want firm scoopable ice cream.
  7. Store leftovers in a sealed container in the freezer for up to 2 weeks.

Serving Guide

Dog Size Serving Size How Often
Small (under 20 lb) 1–2 tablespoons 2–3 times per week
Medium (20–50 lb) 3–4 tablespoons 2–3 times per week
Large (50 lb+) Up to ½ cup 2–3 times per week

Calories: approximately 45–60 kcal per 2-tablespoon serving. Treats should make up no more than 10% of your dog’s daily calorie intake.


Recipe 2: Peanut Butter & Pumpkin Dog Ice Cream

Baking homemade treats for pets

This one is perfect for dogs with sensitive stomachs. Pumpkin is one of the best natural digestive aids for dogs — the fibre helps with both diarrhoea and constipation. Combined with creamy peanut butter and plain yoghurt, this ice cream is as healthy as it is delicious.

Ingredients

  • ½ cup plain canned pumpkin (not pumpkin pie filling — must be 100% pure pumpkin)
  • 3 tablespoons xylitol-free peanut butter
  • ½ cup plain unsweetened Greek yoghurt or plain yoghurt
  • 1 teaspoon honey (optional — skip for diabetic dogs)

Instructions

  1. Combine all ingredients in a mixing bowl and stir until completely smooth and well combined.
  2. Taste-test the mixture — it should smell appetising (your dog will certainly agree).
  3. Pour into silicone paw-print moulds, ice cube trays, small paper cups, or a muffin tin lined with cupcake cases.
  4. Freeze for a minimum of 4 hours, or overnight for best results.
  5. Pop out of moulds and serve straight from the freezer. No need to thaw.
  6. Store in a zip-lock bag or airtight container in the freezer for up to 3 weeks.

Why Pumpkin Is Great for Dogs

  • Digestive support: Soluble fibre in pumpkin feeds beneficial gut bacteria and firms up loose stools
  • Low calorie: Plain pumpkin is only 26 kcal per 100g — one of the lowest-calorie dog treats available
  • Vitamins A, C & E: Supports immune function, vision, and skin health
  • Hydration: Pumpkin is 92% water, helping keep dogs hydrated in summer
Dog Size Serving Size How Often
Small (under 20 lb) 1 ice cube or small mould Daily in summer
Medium (20–50 lb) 2–3 ice cubes or 1 large mould Daily in summer
Large (50 lb+) 3–4 ice cubes or 2 moulds Daily in summer

Tip: This recipe is one of the few dog ice creams suitable as a daily summer treat due to its low calorie and high fibre content.


Recipe 3: Peanut Butter, Blueberry & Yoghurt Dog Ice Cream

This is the gourmet version — and the most photogenic one for sharing on Instagram or Pinterest. Blueberries are a superfood for dogs, packed with antioxidants that support brain health and immune function. The swirl of purple against the creamy peanut butter base makes these look absolutely stunning in paw-print moulds.

Ingredients

  • 1 cup plain unsweetened yoghurt (Greek or regular)
  • 4 tablespoons xylitol-free peanut butter
  • ½ cup fresh or frozen blueberries
  • 1 ripe banana (optional — adds extra creaminess)

Instructions

  1. Blend the yoghurt, peanut butter, and banana (if using) until completely smooth. This is your base layer.
  2. In a separate small bowl, mash or briefly blend the blueberries until they form a loose purple puree.
  3. Pour the peanut butter base into your moulds, filling each about two-thirds full.
  4. Drop 1 teaspoon of blueberry puree on top of each mould.
  5. Use a toothpick or skewer to swirl the blueberry through the peanut butter base for a marbled effect.
  6. Tap the moulds gently on the counter to remove air bubbles and level the surface.
  7. Freeze for 4–6 hours or overnight until completely solid.
  8. Run the base of the moulds under warm water for 5 seconds to release cleanly.
  9. Store in a zip-lock bag in the freezer for up to 3 weeks.

Benefits of Blueberries for Dogs

  • Antioxidants: Among the highest antioxidant content of any fruit — supports cognitive function in older dogs
  • Anti-inflammatory: Helps dogs with arthritis and joint inflammation
  • Low sugar, low calorie: Only 57 kcal per 100g; safe for most dogs including those watching their weight
  • Vitamin C & K: Supports immune health and bone strength
Dog Size Serving Size How Often
Small (under 20 lb) 1 small paw mould 2–3 times per week
Medium (20–50 lb) 1 standard mould or 2 small 2–3 times per week
Large (50 lb+) 2 standard moulds 2–3 times per week

Tips for Making Dog Ice Cream at Home

  • Always check for xylitol: Read the peanut butter label every single time — some brands change their formulas
  • Use plain yoghurt only: Never use flavoured, sweetened, or low-fat yoghurt with artificial sweeteners
  • Silicone paw moulds are worth it: They cost around $8–12 on Amazon and make the treats look adorable — perfect for photos
  • Let large dogs eat from a bowl: For big dogs, pour the mixture into a bowl and freeze directly — easier to portion and less mess
  • Serve on a mat or outside: These treats melt fast, especially on a hot day — serve on a lick mat or outside on the grass to avoid floors getting sticky
  • Introduce slowly: If your dog has never had yoghurt or pumpkin, start with a small amount to check for digestive sensitivity

Ingredients to Always Avoid in Dog Ice Cream

Ingredient Why It’s Dangerous Severity
Xylitol Causes rapid insulin release; can cause liver failure 🛑 Toxic — emergency vet
Chocolate Theobromine toxicity — affects heart and nervous system 🛑 Toxic — emergency vet
Grapes & raisins Cause acute kidney failure even in small amounts 🛑 Toxic — emergency vet
Macadamia nuts Causes weakness, hyperthermia, vomiting ⚠️ Toxic — call vet
Flavoured yoghurt Contains added sugar or artificial sweeteners ⚠️ Avoid
Pumpkin pie filling Contains nutmeg which is toxic to dogs ⚠️ Avoid

Frequently Asked Questions

Can dogs eat peanut butter ice cream?

Yes — dogs can eat peanut butter ice cream made with dog-safe ingredients. The key is using xylitol-free peanut butter, plain unsweetened yoghurt, and no chocolate, artificial sweeteners, or toxic fruits. The recipes on this page are specifically formulated to be safe and healthy for dogs.

Can I use regular human ice cream for my dog?

No. Regular human ice cream contains high amounts of sugar, dairy fat, and often artificial additives that are not suitable for dogs. Many also contain xylitol in sugar-free versions, which is fatally toxic to dogs. Always make dog-specific ice cream or use a product labelled safe for dogs.

Is peanut butter safe for dogs?

Plain, xylitol-free peanut butter is safe for dogs in moderation. It is high in fat and calories, so it should be given as an occasional treat rather than a daily staple. Always check the label for xylitol, which is sometimes listed as “birch sugar” or “sugar alcohol.”

How long does homemade dog ice cream last in the freezer?

Homemade dog ice cream keeps well in a sealed container or zip-lock bag in the freezer for 2–3 weeks. After that, ice crystals can form and the texture degrades. Always label containers with the date made.

Can puppies eat dog ice cream?

Puppies under 12 weeks should not be given ice cream treats as their digestive systems are still developing. For puppies over 3 months, a small amount of the banana and peanut butter recipe is the safest option. Avoid yoghurt-based recipes until puppies are fully weaned and eating solid food comfortably, as some puppies are lactose-sensitive.

Apple Crisp Dog Treats Recipe

Apple crisp dog treats combine the natural sweetness of fresh apples with wholesome oats and nutritious ingredients to create treats that dogs absolutely crave. Apples provide essential vitamins, minerals, and dietary fiber that support digestive health and overall wellness while offering natural breath-freshening properties. The crispy texture delivers satisfying crunch that encourages thorough chewing, promoting dental health and reducing plaque buildup. This straightforward recipe requires minimal preparation time while producing treats that remain fresh for extended periods. The combination of natural fruit flavors and crispy texture makes these treats ideal for training rewards, special occasions, or daily treats that support your dog’s nutritional needs.

Ingredients

This recipe requires two medium apples (cored and finely diced), one cup rolled oats, one-half cup natural peanut butter (xylitol-free), one egg, one-quarter cup honey, and one-half cup whole wheat flour. Optional additions include one-quarter teaspoon cinnamon or one-half teaspoon vanilla extract for enhanced flavor. All ingredients should be fresh, dog-safe, and of high quality to ensure maximum nutritional benefit and safety for your canine companion.

Instructions

Begin by preheating your oven to 350°F (175°C) to achieve the perfect crispy texture. In a large mixing bowl, combine one-half cup natural peanut butter with one egg, mixing thoroughly until completely incorporated. Add two medium diced apples (cored and finely diced) and one-quarter cup honey, stirring until evenly distributed throughout the mixture. Gradually add one cup rolled oats, mixing continuously until the mixture becomes thick and manageable.

Stir in one-half cup whole wheat flour until the dough reaches a firm consistency. If desired, add cinnamon or vanilla extract at this stage, mixing until the flavoring is evenly distributed. Transfer the dough to a lightly floured surface and roll to approximately one-quarter inch thickness.

Using dog-bone-shaped cookie cutters or other pet-friendly shapes, cut out individual treats. Place treats on a parchment-lined baking sheet, spacing them approximately one inch apart to allow for even baking and proper air circulation. Bake for twenty to twenty-five minutes until the treats achieve a light golden color and firm, crispy texture throughout.

Remove from the oven and allow to cool completely on the baking sheet before transferring to an airtight container for storage. The treats will continue to crisp as they cool, achieving optimal texture and crunchiness.

Nutritional Benefits

Apples provide vitamin C, potassium, and dietary fiber essential for immune support and digestive health. Rolled oats deliver beta-glucans and antioxidants that support heart health and sustained energy. Peanut butter contributes protein and healthy fats for muscle development and coat health. Honey offers natural antimicrobial properties and trace minerals. The combination creates treats addressing multiple nutritional needs while remaining easily digestible.

Storage and Serving

Store baked treats in an airtight container at room temperature for up to two weeks or refrigerate for one month. Freeze for up to three months for extended storage. Serve one to three treats daily depending on your dog’s size and weight, incorporating them into the recommended 10% daily treat allowance. Always introduce new treats gradually to monitor for any adverse reactions.

Conclusion

Apple crisp dog treats deliver wholesome, delicious nutrition in every bite. This easy recipe combines fresh fruit with nutritious ingredients while requiring minimal time and effort. Your dog will eagerly anticipate these satisfying, crunchy homemade treats.

Crunchy Peanut Butter Dog Cookies – Easy Homemade Recipe

Crunchy peanut butter dog cookies deliver the perfect combination of satisfying texture and irresistible flavor that dogs absolutely crave. The crunchy texture provides natural dental benefits through gentle abrasion while encouraging thorough chewing, which promotes oral health and reduces plaque buildup. Peanut butter offers exceptional nutritional value with high protein content, healthy fats, and essential vitamins that support muscle development, coat health, and overall wellness.

This straightforward recipe requires minimal ingredients and preparation time while producing treats that rival commercial options in quality and nutrition. The baking process creates cookies that remain fresh for extended periods, making them ideal for training rewards, special occasions, or daily treats.

Ingredients

This recipe calls for one cup natural peanut butter (xylitol-free), one-half cup coconut oil, one egg, two cups whole wheat flour, and one-quarter cup honey. Optional additions include one-half teaspoon vanilla extract or one-quarter teaspoon cinnamon for enhanced flavor. All ingredients should be fresh, dog-safe, and of high quality to ensure maximum nutritional benefit and safety for your canine companion.

Instructions

Begin by preheating your oven to 325°F (163°C) to achieve the perfect crunch without burning the cookies. In a large mixing bowl, combine one cup natural peanut butter with one-half cup coconut oil, mixing thoroughly until the ingredients reach a uniform consistency. Add one egg and mix until completely incorporated. Gradually add two cups whole wheat flour, stirring continuously until the dough becomes thick and manageable. Stir in one-quarter cup honey, mixing until evenly distributed throughout the dough. If desired, add vanilla extract or cinnamon at this stage.

Transfer the dough to a lightly floured surface and roll to approximately one-quarter inch thickness. Using dog-bone-shaped cookie cutters or other pet-friendly shapes, cut out individual cookies. Place cookies on a parchment-lined baking sheet, spacing them approximately one inch apart to allow for even baking and air circulation.

Bake for twenty-five to thirty minutes until the cookies achieve a light golden color and firm, crunchy texture throughout. The cookies should feel solid when cooled but may retain slight softness in the center. Remove from the oven and allow to cool completely on the baking sheet before transferring to an airtight container for storage.

Nutritional Benefits

Peanut butter provides exceptional protein content essential for muscle development and maintenance. Coconut oil contributes healthy fats that support skin and coat health while offering anti-inflammatory benefits. Whole wheat flour delivers fiber for digestive support and sustained energy release. The combination creates treats that address multiple nutritional needs while remaining easily digestible and gentle on sensitive stomachs.

Storage and Serving

Store baked cookies in an airtight container at room temperature for up to ten days or refrigerate for three weeks. Freeze for up to three months for extended storage. Serve one to three cookies daily depending on your dog’s size and weight, incorporating them into the recommended 10% daily treat allowance. Always introduce new treats gradually to monitor for any adverse reactions.

Conclusion

Crunchy peanut butter dog cookies provide wholesome, delicious treats that support your dog’s health and happiness. This easy recipe delivers exceptional nutrition in every bite while requiring minimal time and effort. Your dog will eagerly anticipate these satisfying, crunchy homemade cookies.

Peanut Butter Balls for Dogs – Step-by-Step Homemade Recipe

Peanut butter balls for dogs represent a delightful frozen treat that combines natural protein, healthy fats, and irresistible flavor in one delicious package. These no-bake treats require minimal preparation time while delivering exceptional nutritional value through wholesome, dog-safe ingredients. Peanut butter provides essential protein and healthy fats that support muscle development and coat health, while the frozen format offers cooling relief during warm weather. This straightforward recipe yields treats that dogs absolutely love, making them perfect for training rewards, special occasions, or simply showing your furry friend extra affection. The step-by-step approach ensures success even for first-time treat makers.

Ingredients

You will need one cup natural peanut butter (xylitol-free), one-half cup coconut oil, one-quarter cup honey, and one cup rolled oats. Optional additions include one-half teaspoon vanilla extract or one-quarter teaspoon cinnamon for enhanced flavor. All ingredients should be dog-safe and of high quality to ensure maximum nutritional benefit and safety for your canine companion.

Step-by-Step Instructions

Step 1: Prepare Your Workspace
Begin by gathering all ingredients and materials. Line a baking sheet with parchment paper or silicone mats. Prepare a small bowl of water for moistening your hands, which prevents the mixture from sticking during the ball-forming process.
Step 2: Combine Base Ingredients
In a medium mixing bowl, combine one cup natural peanut butter with one-half cup coconut oil. Mix thoroughly until the ingredients are completely blended and reach a uniform consistency. The coconut oil helps create the frozen texture while adding nutritional value.
Step 3: Add Sweetness and Texture
Stir in one-quarter cup honey, mixing until evenly distributed throughout the peanut butter mixture. Add one cup rolled oats gradually, stirring continuously until the mixture reaches a thick, moldable consistency. If desired, add vanilla extract or cinnamon at this stage, stirring until the flavoring is evenly distributed.
Step 4: Form the Balls
Moisten your hands slightly with water to prevent sticking. Scoop approximately one tablespoon of mixture and roll between your palms to form a compact ball. Place each completed ball on the prepared baking sheet. Continue until all mixture is formed into balls, spacing them approximately one inch apart.
Step 5: Initial Freezing
Place the baking sheet in the freezer for one hour until the balls become firm. This initial freezing prevents the balls from losing their shape during the final storage process.
Step 6: Final Storage
Transfer the frozen balls to an airtight container for long-term freezing. Store for up to three months in the freezer. Alternatively, refrigerate for up to one week if serving within a shorter timeframe.

Serving and Storage

Serve one frozen ball as an occasional treat or training reward. Frozen treats provide cooling relief during warm weather while naturally lasting longer than room-temperature treats. Always supervise your dog while enjoying frozen treats to prevent choking hazards. Thaw slightly if your dog has sensitive teeth or prefers softer treats.

Conclusion

Peanut butter balls for dogs deliver homemade goodness in frozen form. This easy step-by-step recipe requires minimal effort while providing maximum enjoyment for your canine companion. Your dog will eagerly anticipate these wholesome, delicious treats.

Sweet Potato Carrot Dog Treats: Nutritious Homemade Recipe

Sweet potato and carrot dog treats represent an exceptional combination of two nutrient-dense vegetables that dogs naturally enjoy. Sweet potatoes provide exceptional nutritional value with high beta-carotene content, supporting eye health and immune function while offering natural sweetness that appeals to canine palates.
Carrots contribute essential vitamins, minerals, and fiber while promoting dental health through their natural abrasive texture. Together, these vegetables create treats that address multiple nutritional needs while remaining gentle on sensitive digestive systems. This straightforward recipe requires minimal ingredients and preparation time, making it perfect for busy pet parents seeking wholesome homemade alternatives to commercial treats.

Ingredients

This recipe calls for two cups finely grated sweet potato, one and one-half cups finely grated carrot, one egg, and one-half cup whole wheat flour. Optional additions include one-quarter teaspoon cinnamon for anti-inflammatory benefits or one tablespoon honey for enhanced natural sweetness. All ingredients should be fresh and of high quality to maximize nutritional benefit for your dog. Organic produce is recommended when possible to minimize pesticide exposure.

Step-by-Step Instructions

Begin by preheating your oven to 350°F (175°C). In a large mixing bowl, combine the grated sweet potato, grated carrot, egg, and whole wheat flour. Mix thoroughly until all ingredients are well incorporated and the mixture reaches a consistent, slightly crumbly texture. If the mixture appears too dry, add water one tablespoon at a time until reaching the desired consistency. Stir in cinnamon and honey if desired, mixing until evenly distributed throughout the dough.
Spoon the mixture onto a parchment-lined baking sheet, forming small mounds approximately one inch in diameter. Flatten each treat slightly with the back of a spoon to ensure even baking and consistent thickness. Bake for twenty to twenty-five minutes until the treats achieve a light golden color and firm texture throughout. The treats should feel solid when cooled but may retain slight chewiness inside. Remove from the oven and allow to cool completely on the baking sheet before transferring to an airtight container for storage.

Nutritional Benefits

Sweet potatoes deliver exceptional nutritional value with high levels of beta-carotene, which converts to vitamin A in your dog’s body, supporting vision and immune function. The natural fiber content promotes digestive health and regular bowel movements while supporting healthy weight management.
Carrots provide additional vitamins, minerals, and antioxidants while their natural texture supports dental health through gentle abrasion. Together, these vegetables create treats that support multiple aspects of canine health while remaining easily digestible and gentle on sensitive stomachs.

Storage and Serving Guidelines

Store baked treats in an airtight container at room temperature for up to seven days or refrigerate for two weeks. Freeze for up to three months for extended storage. Serve one to three treats daily depending on your dog’s size and weight, incorporating them into the recommended 10% daily treat allowance. Always introduce new treats gradually to monitor for any adverse reactions, particularly if your dog has never consumed sweet potatoes or carrots previously.

Conclusion

Sweet potato and carrot dog treats provide nutritious, delicious options that support your dog’s overall health. This easy recipe delivers wholesome nutrition in every bite while requiring minimal time and effort. Your dog will enjoy these naturally sweet, flavorful treats while you appreciate the confidence of providing carefully crafted, nutrient-dense homemade nutrition.
Carrot Oat Dog Treat Recipe

Carrot Oat Dog Treat Recipe

Carrot oat dog treats combine two nutritional powerhouses into delicious, crunchy bites that dogs absolutely love. Carrots provide essential vitamins, minerals, and natural fiber while supporting dental health through their natural abrasive texture. Oats offer sustained energy release, soluble fiber for digestive support, and valuable nutrients including manganese and phosphorus.
This easy bake recipe requires minimal ingredients and preparation time, making it perfect for busy pet parents seeking wholesome homemade alternatives to commercial treats. The combination of natural sweetness from carrots and the hearty texture of oats creates treats that satisfy your dog’s cravings while supporting their overall health and wellness.

Ingredients

The simplicity of this recipe makes it accessible for all skill levels. You will need two cups finely grated carrots, one and one-half cups rolled oats, one-half cup natural peanut butter, one egg, and one tablespoon honey. Optional additions include one-half teaspoon cinnamon for anti-inflammatory benefits or one-quarter cup coconut oil for enhanced skin and coat health. All ingredients should be fresh and of high quality to ensure maximum nutritional benefit for your dog.

Step-by-Step Instructions

Begin by preheating your oven to 350°F (175°C). In a large mixing bowl, combine the grated carrots, rolled oats, natural peanut butter, and egg. Mix thoroughly until all ingredients are well incorporated and the mixture reaches a consistent texture. The mixture should hold together when pressed but remain slightly crumbly. If the mixture appears too dry, add one tablespoon of water at a time until reaching the desired consistency. Stir in honey and optional cinnamon if desired, mixing until evenly distributed throughout.
Spoon the mixture onto a parchment-lined baking sheet, forming small mounds or using a cookie scoop for uniform sizing. Flatten each treat slightly with the back of a spoon to ensure even baking. Bake for twenty to twenty-five minutes until the treats achieve a light golden color and firm texture. The treats should feel solid when cooled but remain slightly chewy inside. Remove from the oven and allow to cool completely on the baking sheet before transferring to an airtight container.

Nutritional Benefits

Carrots provide beta-carotene, which converts to vitamin A in your dog’s body, supporting eye health and immune function. The natural fiber content aids digestive health and promotes regular bowel movements. Oats deliver soluble fiber that helps maintain healthy cholesterol levels and provides sustained energy throughout the day.
Peanut butter contributes healthy fats and protein essential for muscle maintenance and development. The combination creates treats that address multiple nutritional needs while remaining gentle on sensitive digestive systems.

Storage and Serving Guidelines

Store baked treats in an airtight container at room temperature for up to seven days or refrigerate for two weeks. Freeze for up to three months for extended storage. Serve one to three treats daily depending on your dog’s size and weight, incorporating them into the recommended 10% daily treat allowance. Always introduce new treats gradually to monitor for any adverse reactions, particularly if your dog has never consumed carrots or oats previously.

Conclusion

Carrot oat dog treats represent an excellent choice for pet parents seeking nutritious, homemade alternatives. This easy bake recipe delivers wholesome nutrition in every bite while requiring minimal time and effort. Your dog will enjoy these crunchy, flavorful treats while you appreciate the confidence of providing carefully crafted, nutrient-dense nutrition.

Easy Homemade Two-Ingredient Dog Treats

Two-ingredient dog treats prove that homemade pet nutrition doesn’t require complicated recipes or extensive ingredient lists. These simple combinations deliver wholesome nutrition while requiring minimal preparation time, making them perfect for busy pet parents. Whether you’re looking for frozen treats, baked biscuits, or no-bake options, these eight recipes demonstrate how easily you can create delicious treats using just two basic ingredients. Your dog will enjoy these simple yet satisfying treats while you appreciate the convenience and cost-effectiveness of homemade pet treats.

Recipe 1: Banana & Peanut Butter Frozen Bites

Mash one ripe banana with one-half cup natural peanut butter. Spoon into ice cube trays and freeze for four hours. These naturally sweet treats require no baking and provide quick energy and healthy fats.

Recipe 2: Sweet Potato & Egg Biscuits

Combine two cups grated sweet potato with two beaten eggs. Bake spoonfuls at 350°F for twenty-five minutes until firm. Sweet potatoes provide fiber and beta-carotene while eggs add protein.

Recipe 3: Pumpkin & Yogurt Frozen Treats

Mix one cup pumpkin puree with one cup plain Greek yogurt. Freeze in ice cube trays overnight. This combination offers digestive support and probiotics for gut health.

Recipe 4: Apple & Cinnamon Baked Bites

Blend two cups unsweetened applesauce with one-quarter teaspoon cinnamon. Bake at 325°F for thirty minutes until dried. Apples provide natural fiber while cinnamon supports anti-inflammatory benefits.

Recipe 5: Carrot & Coconut Oil Treats

Combine two cups finely grated carrot with two tablespoons melted coconut oil. Bake at 350°F for twenty minutes. Carrots support dental health and vision while coconut oil promotes healthy skin and coat.

Recipe 6: Peanut Butter & Oat Biscuits

Mix one cup natural peanut butter with one and one-half cups rolled oats. Form into small biscuits and bake at 325°F for twenty minutes. Oats provide fiber and sustained energy release.

Recipe 7: Blueberry & Banana Frozen Bites

Blend one cup fresh blueberries with one ripe banana. Freeze in silicone molds for six hours. Blueberries offer antioxidants while bananas provide potassium and natural sweetness.

Recipe 8: Chicken Broth & Rice Bites

Simmer one cup low-sodium chicken broth with one cup cooked rice until combined. Freeze in ice cube trays overnight. This savory combination provides hydration and easily digestible carbohydrates.

Benefits of Two-Ingredient Treats

Two-ingredient treats offer exceptional convenience without sacrificing nutritional value. These simple combinations eliminate concerns about artificial additives, preservatives, or unnecessary fillers. The minimal ingredient list makes these treats ideal for dogs with food sensitivities or allergies, as you control exactly what enters your dog’s diet. Preparation requires minimal time investment while costs remain significantly lower than commercial alternatives.

Storage and Serving Guidelines

Store baked treats in airtight containers at room temperature for five days or refrigerate for two weeks. Freeze for up to three months for extended storage. Frozen treats can be served directly from the freezer or thawed slightly depending on your dog’s preference. Serve one to three treats daily depending on your dog’s size, incorporating them into the recommended 10% daily treat allowance. Always introduce new treats gradually to monitor for any adverse reactions.

Conclusion

Two-ingredient dog treats demonstrate that simplicity and nutrition go hand in hand. These eight recipes provide quick, convenient options for pet parents seeking wholesome homemade alternatives. Your dog will enjoy these simple yet satisfying treats while you appreciate the ease, affordability, and quality of homemade pet nutrition
Pumpkin & Lentil Crunch Dog Biscuits

Pumpkin & Lentil Crunch Dog Biscuits

Pumpkin and lentil dog biscuits combine two nutritional powerhouses into treats that dogs absolutely love. Pumpkin provides fiber and digestive support while lentils deliver plant-based protein and essential nutrients. These five recipes showcase different variations of this wholesome combination, each offering unique flavor profiles and nutritional benefits. Whether your dog requires additional fiber, protein supplementation, or simply enjoys delicious homemade treats, these biscuits deliver both taste and nutrition in every bite.

Recipe 1: Classic Pumpkin & Red Lentil Biscuits

Combine one cup pumpkin puree with one-half cup cooked red lentils, one cup whole wheat flour, one egg, and one tablespoon honey. Mix until well combined, then roll out and cut into bone shapes. Bake at 350°F for twenty-five minutes until firm. Red lentils provide excellent protein and break down easily for superior digestibility.

Recipe 2: Pumpkin, Lentil & Sweet Potato Crunch

Mix one cup pumpkin puree with one-half cup cooked green lentils, one-half cup grated sweet potato, one cup oat flour, and one egg. Form into small biscuits and bake at 325°F for thirty minutes until crispy. Sweet potato adds natural sweetness and beta-carotene while green lentils provide sustained protein release.

Recipe 3: Pumpkin Lentil & Carrot Crunch Bites

Combine one cup pumpkin puree with one-half cup cooked lentils, one-half cup finely grated carrot, one cup brown rice flour, one egg, and one-quarter teaspoon turmeric. Bake at 350°F for twenty-eight minutes until golden. Carrots enhance vision health while turmeric provides anti-inflammatory benefits.

Recipe 4: Apple & Pumpkin Lentil Biscuits

Mix one cup pumpkin puree with one-half cup cooked lentils, one-half cup finely chopped apple, one cup whole wheat flour, one egg, and one-half teaspoon cinnamon. Bake at 325°F for thirty-two minutes until thoroughly baked. Apples provide natural fiber and digestive enzymes while cinnamon supports blood sugar regulation.

Recipe 5: Pumpkin Lentil & Spinach Power Biscuits

Combine one cup pumpkin puree with one-half cup cooked lentils, one-half cup finely chopped spinach, one cup oat flour, one egg, and one tablespoon coconut oil. Form into biscuits and bake at 350°F for twenty-six minutes. Spinach provides iron and antioxidants while coconut oil supports skin and coat health.

Nutritional Benefits

Lentils provide complete protein with all essential amino acids, making them valuable for muscle maintenance and development. Pumpkin’s high fiber content supports digestive health and promotes regular bowel movements. Together, these ingredients create treats that address common nutritional needs while remaining gentle on sensitive digestive systems. The variety of recipes allows you to rotate flavors while maintaining consistent nutritional support.

Storage and Serving Guidelines

Store baked biscuits in an airtight container at room temperature for up to seven days or refrigerate for two weeks. Freeze for up to three months for extended storage. Serve one to three biscuits daily depending on your dog’s size, incorporating them into the recommended 10% daily treat allowance. Always introduce new treats gradually to monitor for any adverse reactions, particularly if your dog has never consumed lentils previously.

Conclusion

Pumpkin and lentil dog biscuits provide nutritious, delicious options that support your dog’s overall health. These five recipes demonstrate how simple, wholesome ingredients create satisfying treats with exceptional nutritional value. Your dog will enjoy these crunchy, flavorful biscuits while you enjoy the confidence of providing carefully crafted, nutrient-dense treats.
DIY Turkey, Oat & Yogurt Treats for Dogs

DIY Turkey, Oat & Yogurt Treats for Dogs

Treat your furry friend to something special with these homemade Turkey, Oat & Yogurt Treats! They are a fantastic, healthy alternative to store-bought snacks and are incredibly easy to make. Packed with lean protein from the turkey and gut-friendly probiotics from the yogurt, these treats are as nutritious as they are delicious. Plus, they are completely flour-free, making them a great option for dogs with grain sensitivities.

Let’s gather our ingredients and get started!

Ingredients:

  • 1 cup cooked, shredded turkey (ensure no bones or skin)

  • 1 ½ cups rolled oats

  • ½ cup plain, unsweetened yogurt (ensure it is xylitol-free)

  • 1 large egg

  • 2 tablespoons chopped fresh parsley (optional, for fresh breath)

Now, let’s mix everything together to create the perfect treat dough.

Instructions:

  1. Preheat: Preheat your oven to 350°F (175°C) and line a baking sheet with parchment paper.

  2. Combine Ingredients: In a large bowl, combine the shredded turkey, rolled oats, yogurt, egg, and parsley (if using).

  3. Mix Well: Stir with a large spoon until all the ingredients are thoroughly mixed and form a cohesive, slightly sticky dough.

  4. Form Treats: Using your hands or a small scoop, form the dough into small, bite-sized balls (about 1 inch in diameter).

  5. Place on Tray: Place the balls on the prepared baking sheet, leaving a little space between each one. You can flatten them slightly with your fingers or a fork if you prefer a cookie shape.

  6. Bake: Bake for 18-22 minutes, or until the treats are golden brown and firm to the touch.

  7. Cool: Let the treats cool completely on the baking sheet before serving them to your pup.

The result will be a batch of irresistible, golden-brown treats your dog will love!

Storage: Store these treats in an airtight container in the refrigerator for up to one week. For longer storage, you can freeze them for up to 3 months. Just thaw a few at a time as needed

Easy Homemade Dog Treats Without Flour

Easy Homemade Dog Treats Without Flour

Looking for simple, flour-free dog treat recipes? You’ve come to the right place! These homemade dog treats are packed with wholesome ingredients and are free from common allergens like wheat flour. They’re easy to make and your pup is sure to love them. We’ve included a few of our favorites below, complete with images of the finished products!

1. Sweet Potato & Peanut Butter Bites

These soft and chewy bites are a classic for a reason. The combination of sweet potato and peanut butter is irresistible to most dogs.

Ingredients:

  • 1 cup cooked, mashed sweet potato

  • 1/2 cup creamy peanut butter (xylitol-free)

  • 2 eggs

Instructions:

  1. Preheat your oven to 350°F (175°C) and line a baking sheet with parchment paper.

  2. In a bowl, mix all the ingredients until well combined.

  3. Roll the dough into small balls and place them on the baking sheet. You can flatten them slightly with a fork.

  4. Bake for 15-20 minutes, or until they are firm to the touch.

  5. Let them cool completely before serving.

2. Pumpkin & Apple Dog Cookies

Pumpkin is great for digestion, and the apple adds a nice crunch and sweetness. These heart-shaped cookies are perfect for showing your pup some love!

Ingredients:

  • 1 cup pure pumpkin puree (not pumpkin pie filling)

  • 1 apple, peeled, cored, and grated

  • 1 egg

  • 2 1/2 cups rolled oats (or oat flour for a smoother texture)

Instructions:

  1. Preheat oven to 350°F (175°C). Line a baking sheet with parchment paper.

  2. Combine pumpkin, grated apple, and egg in a bowl.

  3. Gradually add the oats until a dough forms that you can roll out.

  4. Roll the dough to about 1/4 inch thickness on a floured surface (use oat flour) and cut out shapes with a cookie cutter.

  5. Place on the baking sheet and bake for 25-30 minutes until golden and firm.

  6. Cool completely before serving.

3. Frozen Yogurt & Banana Pupsicles

These frozen treats are a perfect way to cool your dog down on a hot day. They’re super simple to make and only require three ingredients!

Ingredients:

  • 1 ripe banana

  • 1 cup plain, unsweetened yogurt

  • 1 tablespoon honey (optional)

Instructions:

  1. In a blender or food processor, combine all ingredients until smooth.

  2. Pour the mixture into a silicone mold (like the paw print ones pictured) or an ice cube tray.

  3. Freeze for at least 4 hours, or until solid.

  4. Pop them out and give one to your pup for a refreshing treat!

4. Chicken & Rice Balls

A simple and bland option, perfect for dogs with sensitive stomachs. These are a great way to use up leftover chicken and rice.

Ingredients:

  • 1 cup cooked, shredded chicken breast

  • 1/2 cup cooked white or brown rice

  • 1 egg

  • 1 tablespoon parsley (optional)

Instructions:

  1. Preheat oven to 350°F (175°C).

  2. In a bowl, mix all ingredients until well combined.

  3. Roll the mixture into bite-sized balls.

  4. Place on a parchment-lined baking sheet and bake for 15-20 minutes.

  5. Let them cool before serving.

5. Carrot & Coconut Drops

These small, crunchy treats are packed with fiber and healthy fats. They’re a perfect size for training!

Ingredients:

  • 1 cup grated carrots

  • 1/2 cup coconut flour

  • 2 eggs

  • 2 tablespoons coconut oil, melted

Instructions:

  1. Preheat oven to 325°F (165°C). Line a baking sheet with parchment paper.

  2. In a large bowl, whisk the eggs and melted coconut oil.

  3. Stir in the grated carrots and coconut flour. Mix until a dough forms.

  4. Scoop small amounts of dough (about a teaspoon) and roll into balls, then flatten slightly.

  5. Place on the baking sheet and bake for 20-25 minutes or until golden.

  6. Cool completely on a wire rack.

Homemade Dog Treats Without Flour

Homemade Dog Treats Without Flour

Flour-free dog treats offer an excellent solution for dogs with grain sensitivities, allergies, or digestive issues. By eliminating flour entirely, you create treats that are naturally gentle on sensitive systems while maintaining delicious flavors dogs love.
These five recipes showcase how simple ingredients like fruits, vegetables, proteins, and natural binders can create satisfying treats without any grain products. Whether your dog requires a grain-free diet or you simply prefer alternative options, these recipes deliver wholesome nutrition in convenient treat form.

Recipe 1: Banana and Peanut Butter Bites

Mash two ripe bananas with one-half cup natural peanut butter until well combined. Spoon the mixture into silicone molds or ice cube trays and freeze for at least four hours. These naturally sweet treats require no baking, making them quick and convenient. The banana provides natural sweetness and fiber while peanut butter adds protein and healthy fats.

Recipe 2: Sweet Potato and Egg Patties

Combine two cups grated sweet potato with two beaten eggs and one-quarter teaspoon turmeric. Drop spoonfuls onto a baking sheet and bake at 350°F for twenty-five minutes until golden and firm. These vegetable-based patties provide excellent nutrition from sweet potatoes’ beta-carotene and fiber without any grain products.

Recipe 3: Chicken and Vegetable Nuggets

Mix two cups shredded cooked chicken with one cup finely grated zucchini, one-half cup grated carrot, and one egg. Form into small nuggets and bake at 375°F for twenty minutes until cooked through. These protein-rich treats combine lean meat with nutrient-dense vegetables for balanced nutrition.

Recipe 4: Apple and Cinnamon Frozen Treats

Blend two cups unsweetened applesauce with one-half cup plain Greek yogurt and one-quarter teaspoon cinnamon. Pour into ice cube trays and freeze overnight. These refreshing treats offer probiotics from yogurt, fiber from apples, and anti-inflammatory benefits from cinnamon, all without any flour.

Recipe 5: Pumpkin and Coconut Oil Bites

Combine one cup pumpkin puree with two tablespoons coconut oil and one tablespoon honey. Spoon into silicone molds and freeze for six hours. These simple treats provide pumpkin’s digestive benefits, coconut oil’s healthy fats, and honey’s natural sweetness without requiring any flour or baking.

Benefits of Flour-Free Treats

Flour-free treats eliminate common allergens that affect many dogs, particularly wheat and grains. These treats often digest more easily, making them ideal for dogs with sensitive stomachs or inflammatory bowel conditions. The natural ingredients used in flour-free recipes typically provide superior nutrition compared to commercial treats containing grain fillers and artificial additives.

Storage and Serving Guidelines

Refrigerate unbaked treats for up to one week or freeze for up to three months. Baked treats remain fresh at room temperature for five days or refrigerated for two weeks. Serve one to three treats daily depending on your dog’s size, incorporating them into the recommended 10% daily treat allowance. Always introduce new treats gradually to monitor for any adverse reactions.

Conclusion

Flour-free homemade dog treats provide nutritious, delicious options for dogs requiring grain-free diets. These five recipes demonstrate how simple, wholesome ingredients create satisfying treats without flour. Your dog will enjoy these healthy alternatives while you enjoy the confidence of knowing exactly what they’re consuming.
Long-Lasting Homemade Dog Treats

Long-Lasting Homemade Dog Treats

Long-lasting homemade dog treats serve a dual purpose: they provide mental stimulation and entertainment while keeping your dog occupied for extended periods. Unlike quick-consumption treats, these durable chews encourage natural chewing behaviors and can help reduce destructive tendencies. By making these treats at home, you control every ingredient, ensuring your dog receives wholesome nutrition without artificial additives. These five recipes offer variety in flavors and textures while maintaining the durability dogs need for extended enjoyment.

Recipe 1: Frozen Peanut Butter Kong Treats

Mix one cup natural peanut butter with one-half cup plain yogurt. Stuff the mixture into Kong toys and freeze for at least four hours. This combination creates a long-lasting treat that takes dogs considerable time to work through, providing mental engagement and satisfying their natural chewing instincts.

Recipe 2: Sweet Potato and Carrot Chews

Slice sweet potatoes and carrots lengthwise into quarter-inch strips. Arrange on a baking sheet and bake at 250°F for three hours until completely dehydrated and hardened. These naturally chewy treats provide fiber and nutrients while lasting significantly longer than fresh vegetables, offering hours of chewing satisfaction.

Recipe 3: Beef Broth Ice Cubes

Simmer low-sodium beef broth for thirty minutes, then pour into ice cube trays and freeze overnight. These savory frozen treats melt slowly in your dog’s mouth, providing hydration and flavor while keeping them engaged during warm weather. The gradual melting process extends treat duration considerably.

Recipe 4: Pumpkin and Peanut Butter Biscuit Logs

Combine one cup pumpkin puree, one-half cup natural peanut butter, one and one-half cups whole wheat flour, and one egg. Roll the dough into thick logs, approximately one inch in diameter. Bake at 325°F for forty-five minutes until extremely hard and dense. These substantial biscuits require significant chewing effort, making them ideal for extended entertainment.

Recipe 5: Chicken and Rice Stuffed Bones

Simmer shredded chicken with cooked rice until well combined. Pack this mixture into marrow bones or hollowed beef bones, then freeze for at least six hours. Dogs must work diligently to extract the filling, providing extended mental stimulation and satisfying their natural foraging instincts.

Benefits of Long-Lasting Treats

Long-lasting treats offer multiple advantages beyond simple entertainment. They promote dental health through natural abrasion, reduce anxiety through focused activity, and provide appropriate outlets for chewing behavior. These treats also help manage weight by providing satisfaction without excessive calories when portions are controlled appropriately.

Storage and Safety Guidelines

Store frozen treats in the freezer for up to three months. Refrigerated treats remain fresh for up to one week. Always supervise your dog while enjoying treats, and remove any small pieces that could pose choking hazards. Consult your veterinarian before introducing new treats, especially for dogs with dietary sensitivities or health conditions.

Conclusion

Long-lasting homemade dog treats combine entertainment, nutrition, and behavioral benefits into simple, affordable options. By rotating these five recipes, you provide variety while keeping your dog mentally stimulated and physically satisfied. Your dog will reward your effort with contentment and healthy chewing habits.

Homemade Gluten Free Dog Biscuits

Homemade Gluten Free Dog Biscuits are an excellent choice for dogs with sensitivities, allergies, or digestive issues. By making treats at home, you maintain complete control over ingredients, eliminating gluten and other potential allergens. These biscuits provide the same nutritional benefits and delicious taste as traditional treats while being gentle on sensitive digestive systems. Whether your dog has celiac-like sensitivities or you simply prefer grain-free options, this recipe delivers wholesome nutrition in a form your dog will love.

Ingredients

1 cup brown rice flour
1/2 cup coconut flour
1/2 cup natural peanut butter (xylitol-free)
1 ripe banana, mashed
1 egg
1/4 teaspoon turmeric (optional, supports joint health)
2-3 tablespoons water (as needed)

Instructions

Step 1: Prepare Your Workspace
Preheat your oven to 350°F (175°C) and line a baking sheet with parchment paper. This prevents sticking and ensures easy cleanup. Gather all ingredients and have them ready before beginning.
Step 2: Combine Wet Ingredients
In a large mixing bowl, combine the mashed banana with the natural peanut butter. Stir thoroughly until well blended and smooth. The banana provides natural sweetness and binding properties while peanut butter adds protein and healthy fats. Ensure no lumps remain in the mixture.
Step 3: Add Dry Ingredients
Add the brown rice flour and coconut flour to the wet mixture. If using turmeric, add it now for anti-inflammatory benefits. Stir until all dry ingredients are incorporated. Brown rice flour provides a mild, neutral flavor while coconut flour adds nutrition and slight sweetness. The combination creates an excellent gluten-free base.
Step 4: Bind the Dough
Crack the egg into the mixture and stir thoroughly. The egg acts as a binder, holding all ingredients together. If the dough seems too dry, add water one tablespoon at a time until you achieve a workable consistency similar to sugar cookie dough. Gluten-free doughs often require slightly more moisture than traditional recipes.
Step 5: Shape and Cut
On a lightly floured surface (use rice flour), roll out the dough to approximately 1/4 inch thickness. Using cookie cutters, cut out your desired shapes. Bone-shaped cutters work beautifully for a fun presentation. Place shaped biscuits on the prepared baking sheet with about an inch of space between each one.
Step 6: Bake Until Golden
Bake for 18-22 minutes until golden brown and firm to the touch. The exact time depends on your oven and biscuit size. Remove from the oven and allow to cool completely on a wire rack before serving to your dog.

Storage and Nutrition

Store cooled biscuits in an airtight container at room temperature for up to five days, in the refrigerator for up to two weeks, or in the freezer for up to three months. These biscuits provide excellent nutrition from brown rice flour’s B vitamins, coconut flour’s fiber and healthy fats, and banana’s potassium and natural sweetness.

Serving and Safety

Offer one to three biscuits daily depending on your dog’s size, incorporating them into the 10% treat allowance. Always use natural peanut butter without xylitol. Consult your veterinarian if your dog has specific allergies or health conditions before introducing new treats.

Conclusion

Homemade Gluten Free Dog Biscuits offer a simple, nutritious solution for dogs with sensitivities. With minimal ingredients and straightforward preparation, these treats are accessible to any pet parent. Your dog will enjoy delicious, wholesome treats while you enjoy the peace of mind knowing exactly what they’re eating.
Pumpkin Dog Biscuits with Peanut Butter

Pumpkin Dog Biscuits with Peanut Butter

Pumpkin Dog Biscuits with Peanut Butter combine two of the most beloved flavors in the canine world into one irresistible treat. The natural sweetness of pumpkin pairs beautifully with the rich, savory appeal of peanut butter, creating a flavor profile that dogs find absolutely compelling. These biscuits are perfect for training rewards, special occasions, or simply showing your furry friend how much you care.
Ingredients
1 cup pure pumpkin puree
1/2 cup natural peanut butter (xylitol-free)
1 1/2 cups whole wheat flour
1/2 cup rolled oats
1 egg
1/2 teaspoon cinnamon (optional)
2-3 tablespoons water (as needed)

Instructions

Step 1: Preheat and Prepare
Preheat your oven to 350°F (175°C) and line a baking sheet with parchment paper. This prevents sticking and makes cleanup easier.
Step 2: Mix Wet Ingredients
In a large mixing bowl, combine the pure pumpkin puree with the natural peanut butter. Stir thoroughly until well blended and smooth. The mixture should have a uniform consistency without any lumps.
Step 3: Add Dry Ingredients
Add the whole wheat flour, rolled oats, and optional cinnamon to the pumpkin-peanut butter mixture. Stir until all dry ingredients are incorporated. The cinnamon adds warmth and depth to the flavor while providing digestive support.
Step 4: Bind the Dough
Crack the egg into the mixture and stir thoroughly. The egg acts as a binder, holding all ingredients together. If the dough seems too dry, add water one tablespoon at a time until you achieve a workable consistency similar to sugar cookie dough.
Step 5: Shape the Biscuits
On a lightly floured surface, roll out the dough to approximately 1/4 inch thickness. Using cookie cutters, cut out your desired shapes—bone shapes work wonderfully for a fun presentation. Place shaped biscuits on the prepared baking sheet with about an inch of space between each one.
Step 6: Bake
Bake for 18-22 minutes until golden brown and firm to the touch. The exact time depends on your oven and biscuit size. Remove from the oven and allow to cool completely on a wire rack before serving.

Storage and Nutrition

Store cooled biscuits in an airtight container at room temperature for up to five days, in the refrigerator for up to two weeks, or in the freezer for up to three months. These biscuits provide excellent nutrition from pumpkin’s fiber and beta-carotene, peanut butter’s protein and healthy fats, and whole grains’ sustained energy.

Serving Suggestions

Offer one to three biscuits daily depending on your dog’s size, incorporating them into your dog’s 10% treat allowance. These biscuits work wonderfully as training rewards, puzzle toy fillers, or special treats for your beloved companion.

Safety Notes

Always use natural peanut butter without xylitol, which is toxic to dogs. Use pure pumpkin puree, never pumpkin pie filling. Supervise your dog while enjoying treats, and consult your veterinarian if your dog has dietary sensitivities or health conditions.
Conclusion
Pumpkin Dog Biscuits with Peanut Butter offer a simple, nutritious way to show your dog love through homemade treats. With minimal ingredients and straightforward preparation, these biscuits are accessible to any pet parent. Your dog will reward your effort with tail wags and excitement every treat time.