Homemade Pumpkin Dog Biscuits

Homemade Pumpkin Dog Biscuits

These biscuits are a seasonal favorite, but they are great for your dog year-round! Pumpkin is a superfood for dogs, helping with digestion and providing essential vitamins. The addition of an egg and a touch of cinnamon makes them irresistible.
Yields: Approximately 3-4 dozen small treats Prep time: 15 minutes Cook time: 30-35 minutes

Ingredients:

  • 2 1/2 cups whole wheat flour (or all-purpose flour)
  • 1 cup pure pumpkin puree (NOT pumpkin pie filling)
  • 1 large egg
  • 1/2 cup water or low-sodium chicken/beef broth
  • 1 teaspoon ground cinnamon (optional, for flavor)

Instructions:

  1. Preheat Oven: Preheat your oven to 350°F (175°C). Line a large baking sheet with parchment paper.
  2. Combine Wet Ingredients: In a large bowl, whisk together the pumpkin puree, egg, and water (or broth) until well combined.
  3. Add Dry Ingredients: In a separate bowl, whisk together the whole wheat flour and cinnamon (if using).
  4. Form Dough: Gradually add the dry ingredients to the wet ingredients, mixing until a stiff dough forms. You may need to use your hands to knead the last bit of flour in.
  5. Roll and Cut: On a lightly floured surface, roll the dough out to about 1/4-inch thickness. Use a cookie cutter (a pumpkin shape or a simple square works well) to cut out the treats. Place the cutouts on the prepared baking sheet.
  6. Bake: Bake for 30-35 minutes, or until the edges are firm and the biscuits are hard. For extra crunchy biscuits, you can turn off the oven after baking and leave the biscuits inside for another 30 minutes while the oven cools.
  7. Cool and Store: Let the treats cool completely on a wire rack.
Storage: Store cooled treats in an airtight container at room temperature for up to 1 week, or in the refrigerator for up to 2 weeks. They can be frozen for up to 3 months.
Homemade Apple Peanut Butter Dog Treats

Homemade Apple Peanut Butter Dog Treats

This recipe combines the sweet, crisp flavor of apple with the savory richness of peanut butter, creating a wholesome and delicious treat. Apples are a great source of fiber and vitamins for dogs, and this recipe is a perfect way to use up any extra applesauce or fresh apples.
Yields: Approximately 3 dozen treats Prep time: 15 minutes Cook time: 20-25 minutes

Ingredients:

  • 2 cups whole wheat flour (or all-purpose flour)
  • 1/2 cup unsweetened applesauce (or 1/2 cup finely grated apple, peeled and cored)
  • 1/2 cup natural, xylitol-free peanut butter
  • 1 large egg
  • 1/2 teaspoon ground cinnamon (optional, for flavor and health benefits)
  • 1/4 cup water (or more, if needed)

Instructions:

  1. Preheat Oven: Preheat your oven to 350°F (175°C). Line a large baking sheet with parchment paper.
  2. Combine Wet Ingredients: In a large bowl, whisk together the applesauce (or grated apple), peanut butter, egg, and cinnamon (if using).
  3. Add Flour: Gradually add the whole wheat flour to the wet mixture, mixing until a stiff dough forms. Add water one tablespoon at a time if the dough is too dry and crumbly.
  4. Roll and Cut: On a lightly floured surface, roll the dough out to about 1/4-inch thickness. Use a cookie cutter (a fun apple or bone shape is great) to cut out the treats. Place the cutouts on the prepared baking sheet.
  5. Bake: Bake for 20-25 minutes, or until the edges are lightly golden brown and the treats are firm.
  6. Cool and Store: Let the treats cool completely on a wire rack to ensure they are crunchy.

Related Posts:

Important Safety Note: Always remove the core and seeds from apples before using them, as apple seeds contain trace amounts of cyanide.
Storage: Store cooled treats in an airtight container at room temperature for up to 1 week, or in the refrigerator for up to 2 weeks. They can be frozen for up to 3 months.
Homemade Peanut Butter Oat Dog Treats

Homemade Peanut Butter Oat Dog Treats

This is a classic, simple, and incredibly popular recipe among dog owners. The combination of peanut butter and oats makes for a wholesome, fiber-rich, and delicious crunchy treat that is perfect for dogs of all sizes.
Yields: Approximately 4-5 dozen small treats Prep time: 15 minutes Cook time: 18-20 minutes

Ingredients:

  • 2 cups whole wheat flour (or all-purpose flour)
  • 1 cup rolled oats (old-fashioned or quick-cooking)
  • 1/2 cup natural, creamy peanut butter (ensure it is xylitol-free)
  • 1/2 cup water or low-sodium chicken/beef broth
  • 2 large eggs
  • 1 tablespoon honey (optional, for a touch of sweetness)

Instructions:

  1. Preheat Oven: Preheat your oven to 350°F (175°C). Line a large baking sheet with parchment paper.
  2. Combine Dry Ingredients: In a large bowl, whisk together the whole wheat flour and rolled oats.
  3. Combine Wet Ingredients: In a separate medium bowl, whisk together the peanut butter, water (or broth), eggs, and honey (if using) until smooth.
  4. Form Dough: Pour the wet ingredients into the dry ingredients. Mix until a stiff, cohesive dough forms. You may need to use your hands to knead it briefly. If the dough is too dry and crumbly, add water, one teaspoon at a time. If it’s too sticky, add a tablespoon of flour.
  5. Roll and Cut: On a lightly floured surface, roll the dough out to about 1/4-inch thickness. Use your favorite cookie cutter (a simple circle or heart works well) to cut out the treats. Place the cutouts on the prepared baking sheet.
  6. Bake: Bake for 18-20 minutes, or until the edges are lightly golden brown and the treats are firm to the touch.
  7. Cool and Store: Let the treats cool completely on a wire rack. They will harden as they cool, giving them a satisfying crunch.
Storage: Store cooled treats in an airtight container at room temperature for up to 1 week, or in the refrigerator for up to 2 weeks. They can be frozen for up to 3 months.
Peanut Butter Chicken Broth Dog Treats

Peanut Butter Chicken Broth Dog Treats

These savory and slightly sweet treats are a fantastic way to spoil your dog. The combination of chicken broth and peanut butter makes them irresistible, and they are perfect for training or just a daily snack.
Yields: Approximately 3-4 dozen small bone-shaped treats Prep time: 15 minutes Cook time: 20-25 minutes

Ingredients:

  • 2 cups whole wheat flour (or all-purpose flour)
  • 1/2 cup natural, xylitol-free peanut butter
  • 1/2 cup low-sodium chicken broth (ensure it contains no onion or garlic powder)
  • 1 large egg
  • 1/4 cup rolled oats (optional, for texture)

Instructions:

  1. Preheat Oven: Preheat your oven to 350°F (175°C). Line a baking sheet with parchment paper.
  2. Combine Wet Ingredients: In a large bowl, whisk together the egg, peanut butter, and chicken broth until smooth and well combined.
  3. Mix Dry Ingredients: In a separate bowl, whisk together the whole wheat flour and rolled oats (if using).
  4. Form Dough: Gradually add the dry ingredients to the wet ingredients, mixing until a stiff dough forms. You may need to use your hands to knead the last bit of flour in. If the dough is too dry, add a teaspoon of broth; if it’s too sticky, add a tablespoon of flour.
  5. Roll and Cut: On a lightly floured surface, roll the dough out to about 1/4-inch thickness. Use a cookie cutter (a small bone shape is always a hit!) to cut out the treats. Reroll and cut the remaining dough.
  6. Bake: Place the treats on the prepared baking sheet. Bake for 20-25 minutes, or until the edges are lightly golden brown and the treats are firm.
  7. Cool and Store: Let the treats cool completely on a wire rack. This is crucial for them to harden and become crunchy.
Storage: Store cooled treats in an airtight container at room temperature for up to 1 week, or in the refrigerator for up to 2 weeks. For longer storage, freeze them for up to 3 months.
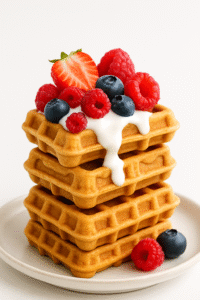
Homemade Dog Waffles

Homemade Peanut Butter & Banana Dog Waffles

These waffles are a fantastic treat for any special occasion, or just to show your dog some extra love. They are made with wholesome ingredients that are great for your dog’s health.

Homemade Dog Waffles

Yields: 6-8 small waffles Prep time: 10 minutes Cook time: 15-20 minutes

Ingredients:

  • 1 cup whole wheat flour (or oat flour for a gluten-free option)
  • 1 ripe banana, mashed
  • 1/4 cup creamy peanut butter (ensure it’s xylitol-free)
  • 1 egg
  • 1/2 cup water or unsweetened almond milk
  • 1 tablespoon honey (optional)
  • 1 teaspoon baking powder

Instructions:

  1. Preheat your waffle iron.
  2. In a large bowl, combine the whole wheat flour and baking powder.
  3. In a separate bowl, whisk together the mashed banana, xylitol-free peanut butter, egg, and water (or almond milk). If you’re using honey, add it in now.
  4. Pour the wet ingredients into the dry ingredients and mix until just combined. Be careful not to overmix; a few lumps are perfectly fine.
  5. Lightly grease your waffle iron with a bit of coconut oil to prevent sticking.
  6. Pour a portion of the batter onto the hot waffle iron (the amount will depend on the size of your iron).
  7. Cook for 3-5 minutes, or until the waffle is golden brown and cooked through.
  8. Carefully remove the waffle and let it cool completely on a wire rack before serving to your eager pup.
Serving Suggestion: For an extra special treat, you can top the cooled waffles with a dollop of plain yogurt and some fresh berries like blueberries or sliced strawberries.
Storage: Store any leftover waffles in an airtight container in the refrigerator for up to 3 days, or freeze them for up to 3 months. You can pop them in the toaster to warm them up before serving.